
Tutorial: Run SPEC CPU 2017 / SPEC CPU 2006 Benchmarks in Full System Mode with gem5art
Introduction
In this tutorial, we will demonstrate how to utilize gem5art and gem5-resources to run SPEC CPU 2017 benchmarks in gem5 full system mode. The scripts in this tutorial work with gem5art v1.3.0, gem5 20.1.0.4, and gem5-resources 20.1.0.4.
The content of this tutorial is mostly for conducting SPEC CPU 2017 experiments.
However, due to the similarity of SPEC 2006 and SPEC 2017 resources, this tutorial also applies to conducting SPEC 2006 experiment by using src/spec-2006 folder instead of src/spec-2017 of gem5-resources.
gem5-resources
gem5-resources is an actively maintained collections of gem5-related resources that are commonly used. The resources include scripts, binaries and disk images for full system simulation of many commonly used benchmarks. This tutorial will offer guidance in utilizing gem5-resources for full system simulation.
gem5 Full System Mode
Different from gem5 SE mode (system emulation mode), the FS mode (full system mode) uses an actual Linux kernel binary instead of emulating the responsibilities of a typical modern OS such as managing page tables and taking care of system calls. As a result, gem5 FS simulation would be more realistic compared to gem5 SE simulation, especially when the interactions between the workload and the OS are significant part of the simulation.
A typical gem5 full system simulation requires a compiled Linux kernel, a disk image containing compiled benchmarks, and gem5 system configurations. gem5-resources typically provides all required all of the mentioned resources for every supported benchmark such that one could download the resources and run the experiment without much modification. However, due to license issue, gem5-resources does not provide a disk image containing SPEC CPU 2017 benchmarks. In this tutorial, we will provide a set of scripts that generates a disk image containing the benchmarks assuming the ISO file of the SPEC CPU 2017 benchmarks is available.
Overall Structure of the Experiment
spec-2017/
  |___ gem5/                                   # gem5 folder
  |
  |___ disk-image/
  |      |___ shared/
  |      |___ spec-2017/
  |             |___ spec-2017-image/
  |             |      |___ spec-2017          # the disk image will be generated here
  |             |___ spec-2017.json            # the Packer script
  |             |___ cpu2017-1.1.0.iso         # SPEC 2017 ISO (add here)
  |
  |___ configs
  |      |___ system/
  |      |___ run_spec.py                      # gem5 run script
  |
  |___ vmlinux-4.19.83                         # Linux kernel, link to download provided below
  |
  |___ README.md
An Overview of Host System - gem5 Interactions
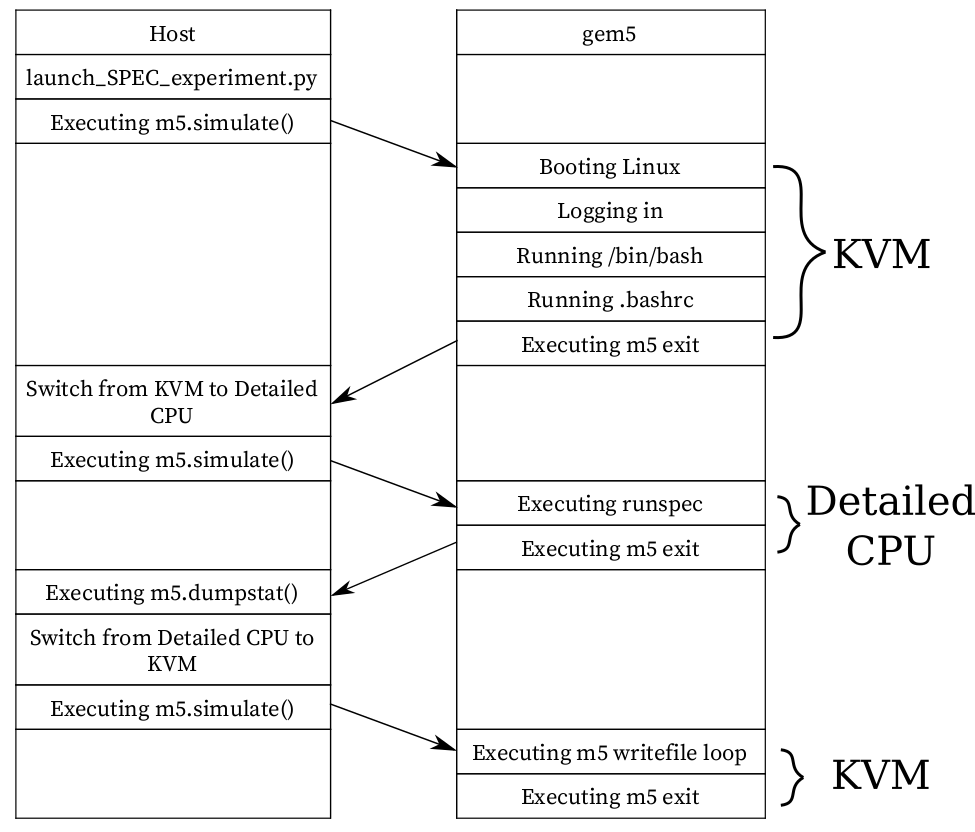 A visual depict of how gem5 interacts with the host system.
gem5 is configured to do the following: booting the Linux kernel, running the benchmark, and copying the SPEC outputs to the host system.
However, since we are interested in getting the stats only for the benchmark, we will configure gem5 to exit after the kernel is booted, and then we reset the stats before running the benchmark.
We use KVM CPU model in gem5 for Linux booting process to quickly boot the system, and after the process is complete, we switch to the desired detailed CPU to run the benchmark.
Similarly, after the benchmark is complete, gem5 exits to host, which allows us to get the stats at that point.
After that, optionally, we switch the CPU back to KVM, which allows us to quickly write the SPEC output files to the host.
A visual depict of how gem5 interacts with the host system.
gem5 is configured to do the following: booting the Linux kernel, running the benchmark, and copying the SPEC outputs to the host system.
However, since we are interested in getting the stats only for the benchmark, we will configure gem5 to exit after the kernel is booted, and then we reset the stats before running the benchmark.
We use KVM CPU model in gem5 for Linux booting process to quickly boot the system, and after the process is complete, we switch to the desired detailed CPU to run the benchmark.
Similarly, after the benchmark is complete, gem5 exits to host, which allows us to get the stats at that point.
After that, optionally, we switch the CPU back to KVM, which allows us to quickly write the SPEC output files to the host.
Note: gem5 will output the stats again when the gem5 run is complete. Therefore, we will see two sets of stats in one file in stats.txt. The stats of the benchmark is the the first part of stats.txt, while the second part of the file contains the stats of the benchmark AND the process of writing output files back to the host. We are only interested in the first part of stats.txt.
Setting up the Experiment
In this part, we have two concurrent tasks: setting up the resources and documenting the process using gem5art.
We will structure the SPEC 2017 resources as laid out by gem5-resources.
The script launch_spec2017_experiment.py will contain the documentation about the artifacts we create and will also serve as Python script that launches the experiment.
Acquiring gem5-resources and Setting up the Experiment Folder
First, we clone the gem5-resource repo and check out the stable branch upto the 1fe56ffc94005b7fa0ae5634c6edc5e2cb0b7357 commit, which is the most recent version of gem5-resources that is compatible with gem5 20.1.0.4 as of March 2021.
git clone https://github.com/gem5/gem5-resources
cd gem5-resources
git checkout 1fe56ffc94005b7fa0ae5634c6edc5e2cb0b7357
Since all resources related to the SPEC CPU 2006 benchmark suite are in the src/spec-2017 and other folders in src/ are not related to this experiment, we set the root folder of the experiment in the src/spec-2017 folder of the cloned repo.
To keep track of changes that are specific to src/spec-2017, we set up a git structure for the folder.
Also, the git remote pointing to origin should also be setup as gem5art will use origin information.
In the gem5-resources folder,
cd src/spec-2017
git init
git remote add origin https://remote-address/spec-experiment.git
We document the root folder of the experiment in launch_spec2017_experiment.py as follows,
experiments_repo = Artifact.registerArtifact(
    command = '''
        git clone https://github.com/gem5/gem5-resources
        cd gem5-resources
        git checkout 1fe56ffc94005b7fa0ae5634c6edc5e2cb0b7357
        cd src/spec-2017
        git init
        git remote add origin https://remote-address/spec-experiment.git
    ''',
    typ = 'git repo',
    name = 'spec2017 Experiment',
    path =  './',
    cwd = './',
    documentation = '''
        local repo to run spec 2017 experiments with gem5 full system mode;
        resources cloned from https://github.com/gem5/gem5-resources upto commit 1fe56ffc94005b7fa0ae5634c6edc5e2cb0b7357 of stable branch
    '''
)
We use .gitignore file to ingore changes of certain files and folders.
In this experiment, we will use this .gitignore file,
*.pyc
m5out
.vscode
results
gem5art-env
disk-image/packer
disk-image/packer_cache
disk-image/spec-2017/spec-2017-image/spec-2017
disk-image/spec-2017/cpu2017-1.1.0.iso
gem5
vmlinux-4.19.83
In the script above, we ignore files and folders that we use other gem5art Artifact objects to keep track of them, or the presence of those files and folders do not affect the experiment’s results.
For example, disk-image/packer is the path to the packer binary which generates the disk image, and newer versions packer probably won’t affect the content of the disk image.
Another example is that we use another gem5art Artifact object to keep track of vmlinux-4.19.83, so we put the name of the file in the .gitignore file.
Note: You probably notice that there are more than one way of keeping track of the files in the experiment folder: either the git structure of the experiment will keep track of a file, or we can create a separate gem5art Artifact object to keep track of that file.
The decision of letting the git structure or creating a new Artifact object leads to different outcomes.
The difference lies on the type of the Artifact object (specified by the typ parameter): for Artifact objects that has typ of git repo, gem5art won’t upload the files in the git structure to gem5art’s database, instead, it will only keep track of the hash of the HEAD commit of the git structure.
However, for Artifact’s that do not have typ that is git repo, the file specfied in the path parameter will be uploaded to the database.
Essentially, we tend to keep small-size files (such as scripts and texts) in a git structure, and to keep large-size files (such as gem5 binaries and disk images) in Artifact’s of type gem5 binary or binary.
Another important difference is that gem5art does not keep track of files in a git Artifact, while it does upload other types of Artifact to its database.
Building gem5
In this step, we download the source code and build gem5 v20.1.0.4. In the root folder of the experiment,
git clone -b v20.1.0.4 https://github.com/gem5/gem5
cd gem5
scons build/X86/gem5.opt -j8
We have two artifacts: one is the gem5 source code (the gem5 git repo), and the gem5 binary (gem5.opt).
In launch_spec2017_experiments.py, we document the step in Artifact objects as follows,
gem5_repo = Artifact.registerArtifact(
    command = '''
        git clone -b v20.1.0.4 https://github.com/gem5/gem5
        cd gem5
        scons build/X86/gem5.opt -j8
    ''',
    typ = 'git repo',
    name = 'gem5',
    path =  'gem5/',
    cwd = './',
    documentation = 'cloned gem5 v20.1.0.4'
)


gem5_binary = Artifact.registerArtifact(
    command = 'scons build/X86/gem5.opt -j8',
    typ = 'gem5 binary',
    name = 'gem5-20.1.0.4',
    cwd = 'gem5/',
    path =  'gem5/build/X86/gem5.opt',
    inputs = [gem5_repo,],
    documentation = 'compiled gem5 v20.1.0.4 binary'
)
Building m5
m5 is a binary that facilitates the communication between the host system and the guest system (gem5). The use of the m5 binary will be demonstrated in the runscripts that we will describe later. m5 binary will be copied to the disk image so that the guest could run m5 binary during the simulation. m5 binary should be compiled before we build the disk image.
Note: it’s important to compile the m5 binary with -DM5_ADDR=0xFFFF0000 as is default in the SConscript.
This address is used by the guest binary to communicate with the simulator.
If you change the address in the guest binary, you also have to update the simulator to use the new address.
Additionally, when running in KVM, it is required that you use the address form of guest<->simulator communication
and not the pseudo instruction form (i.e., using -DM5_ADDR is required when compiling a guest binary for which
you want to run in KVM mode on gem5).
To compile m5 binary, in the root folder of the experiment,
cd gem5/util/m5/
scons build/x86/out/m5
In launch_spec2017_experiments.py, we document the step in an Artifact object as follows,
m5_binary = Artifact.registerArtifact(
    command = 'scons build/x86/out/m5',
    typ = 'binary',
    name = 'm5',
    path =  'gem5/util/m5/build/x86/out/m5',
    cwd = 'gem5/util/m5',
    inputs = [gem5_repo,],
    documentation = 'm5 utility'
)
Building the Disk Image
In this step, we will build the disk image using packer. Note: If you are interested in modifying the SPEC configuration file, Appendix II describes how the scripts that build the disk image work. Also, more information about using packer and building disk images can be found here.
First, we download the packer binary. The current version of packer as of December 2020 is 1.6.6.
cd disk-image/
wget https://releases.hashicorp.com/packer/1.6.6/packer_1.6.6_linux_amd64.zip
unzip packer_1.6.6_linux_amd64.zip
rm packer_1.6.6_linux_amd64.zip
In launch_spec2017_experiments.py, we document how we obtain the binary as follows,
packer = Artifact.registerArtifact(
    command = '''
        wget https://releases.hashicorp.com/packer/1.6.6/packer_1.6.6_linux_amd64.zip;
        unzip packer_1.6.6_linux_amd64.zip;
    ''',
    typ = 'binary',
    name = 'packer',
    path =  'disk-image/packer',
    cwd = 'disk-image',
    documentation = 'Program to build disk images. Downloaded from https://www.packer.io/.'
)
Second, we build the disk image.
The script disk-image/spec-2017/spec-2017.json specifies how the disk image is built.
In this step, we assume the SPEC 2017 ISO file is in the disk-image/spec-2017 folder and the ISO file name is cpu2017-1.1.0.iso.
The path and the name of the ISO file could be changed in the JSON file.
To build the disk image, in the root folder of the experiment,
cd disk-image/
./packer validate spec-2017/spec-2017.json # validate the script, including checking the input files
./packer build spec-2017/spec-2017.json
The process should take about than an hour to complete on a fairly recent machine with a cable internet speed.
The disk image will be in disk-image/spec-2017/spec-2017-image/spec-2017.
Note: Packer will output a URL to a VNC server that could be connected to to inspect the building process.
Note: More about using packer and building disk images.
Now, in launch_spec2017_experiments.py, we make an Artifact object of the disk image.
disk_image = Artifact.registerArtifact(
    command = './packer build spec-2017/spec-2017.json',
    typ = 'disk image',
    name = 'spec-2017',
    cwd = 'disk-image/',
    path = 'disk-image/spec-2017/spec-2017-image/spec-2017',
    inputs = [packer, experiments_repo, m5_binary,],
    documentation = 'Ubuntu Server with SPEC 2017 installed, m5 binary installed and root auto login'
)
Obtaining a Compiled Linux Kernel that Works with gem5
The compiled Linux kernel binaries that is known to work with gem5 can be found here: https://www.gem5.org/documentation/general_docs/gem5_resources/.
The Linux kernel configurations that are used to compile the Linux kernel binaries are documented and maintained in gem5-resources: https://github.com/gem5/gem5-resources/tree/stable/src/linux-kernel/.
The following command downloads the compiled Linux kernel of version 4.19.83. In the root folder of the experiment,
wget http://dist.gem5.org/dist/v21-2/kernels/x86/static/vmlinux-4.19.83
Now, in launch_spec2017_experiments.py, we make an Artifact object of the Linux kernel binary.
linux_binary = Artifact.registerArtifact(
    name = 'vmlinux-4.19.83',
    typ = 'kernel',
    path = './vmlinux-4.19.83',
    cwd = './',
    command = ''' wget http://dist.gem5.org/dist/v21-1/kernels/x86/static/vmlinux-4.19.83''',
    inputs = [experiments_repo,],
    documentation = "kernel binary for v4.19.83",
)
gem5 System Configurations
The gem5 system configurations can be found in the configs/ folder.
The gem5 run script located in configs/run_spec.py, takes the following parameters:
--kernel: (required) the path to vmlinux file.--disk: (required) the path to spec image.--cpu: (required) name of the detailed CPU model. Currently, we are supporting the following CPU models: kvm, o3, atomic, timing. More CPU models could be added to getDetailedCPUModel() in run_spec.py.--benchmark: (required) name of the SPEC CPU 2017 benchmark. The availability of the benchmarks could be found at the end of the tutorial.--size: (required) size of the benchmark. There are three options: ref, train, test.--no-copy-logs: this is an optional parameter specifying whether the spec log files should be copied to the host system.--allow-listeners: this is an optional parameter specifying whether gem5 should open ports so that gdb or telnet could connect to. No listeners are allowed by default.
We don’t use another Artifact object to document this file. The Artifact repository object of the root folder will keep track of the changes of the script.
Running the Experiment
Setting up the Python virtual environment
gem5art code works with Python 3.5 or above.
The following script will set up a python3 virtual environment named gem5art-env. In the root folder of the experiment,
virtualenv -p python3 gem5art-env
To activate the virtual environment, in the root folder of the experiment,
source gem5art-env/bin/activate
To install the gem5art dependency (this should be done when we are in the virtual environment),
pip install gem5art-artifact gem5art-run gem5art-tasks
To exit the virtual environment,
deactivate
Note: the following steps should be done while using the Python virtual environment.
Running the Database Server
The following script will run the MongoDB database server in a docker container.
docker run -p 27017:27017 -v /path/in/host:/data/db --name mongo-1 -d mongo
The -p 27017:27017 option maps the port 27017 in the container to port 27017 on the host. The -v /path/in/host:/data/db option mounts the /data/db folder in the docker container to the folder /path/in/host in the host. The path of the host folder should an absoblute path, and the database files created by MongoDB will be in that folder. The –name mongo-1 option specifies the name of the docker container. We can use this name to identify to the container. The -d option will let the container run in the background. mongo is the name of the offical mongo image.
Running Celery Server (optional)
This step is only necessary if you want to use Celery to manage processes. Inisde the path in the host specified above,
celery -E -A gem5art.tasks.celery worker --autoscale=[number of workers],0
Creating the Launch Script Running the Experiment
Now, we can put together the run script! In launch_spec2017_experiments.py, we import the required modules and classes at the beginning of the file,
import os
import sys
from uuid import UUID

from gem5art.artifact import Artifact
from gem5art.run import gem5Run
from gem5art.tasks.tasks import run_job_pool
And then, we put the launch function at the end of launch_spec2017_experiments.py,
if __name__ == "__main__":
    cpus = ['kvm', 'atomic', 'o3', 'timing']
    benchmark_sizes = {'kvm':    ['test', 'ref'],
                       'atomic': ['test'],
                       'o3':     ['test'],
                       'timing': ['test']
                      }
    benchmarks = ["503.bwaves_r", "507.cactuBSSN_r", "508.namd_r", "510.parest_r", "511.povray_r", "519.lbm_r",
                  "521.wrf_r", "526.blender_r", "527.cam4_r", "538.imagick_r", "544.nab_r", "549.fotonik3d_r",
                  "554.roms_r", "997.specrand_fr", "603.bwaves_s", "607.cactuBSSN_s", "619.lbm_s", "621.wrf_s",
                  "627.cam4_s", "628.pop2_s", "638.imagick_s", "644.nab_s", "649.fotonik3d_s", "654.roms_s",
                  "996.specrand_fs", "500.perlbench_r", "502.gcc_r", "505.mcf_r", "520.omnetpp_r", "523.xalancbmk_r",
                  "525.x264_r", "531.deepsjeng_r", "541.leela_r", "548.exchange2_r", "557.xz_r", "999.specrand_ir",
                  "600.perlbench_s", "602.gcc_s", "605.mcf_s", "620.omnetpp_s", "623.xalancbmk_s", "625.x264_s",
                  "631.deepsjeng_s", "641.leela_s", "648.exchange2_s", "657.xz_s", "998.specrand_is"]

    runs = []
    for cpu in cpus:
        for size in benchmark_sizes[cpu]:
            for benchmark in benchmarks:
                run = gem5Run.createFSRun(
                    'gem5 v20.1.0.4 spec 2017 experiment', # name
                    'gem5/build/X86/gem5.opt', # gem5_binary
                    'gem5-configs/run_spec.py', # run_script
                    'results/{}/{}/{}'.format(cpu, size, benchmark), # relative_outdir
                    gem5_binary, # gem5_artifact
                    gem5_repo, # gem5_git_artifact
                    run_script_repo, # run_script_git_artifact
                    'linux-4.19.83/vmlinux-4.19.83', # linux_binary
                    'disk-image/spec2017/spec2017-image/spec2017', # disk_image
                    linux_binary, # linux_binary_artifact
                    disk_image, # disk_image_artifact
                    cpu, benchmark, size, # params
                    timeout = 10*24*60*60 # 10 days
                )
                runs.append(run)


    run_job_pool(runs)
The above launch function will run the all the available benchmarks with kvm, atomic, timing, and o3 cpus. For kvm, both test and ref sizes will be run, while for the rest, only benchmarks of size test will be run.
Note that the line 'results/{}/{}/{}'.format(cpu, size, benchmark), # relative_outdir specifies how the results folder is structured.
The results folder should be carefully structured so that there does not exist two gem5 runs write to the same place.
Run the Experiment
Having celery and mongoDB servers running, we can start the experiment.
In the root folder of the experiment,
python3 launch_spec2017_experiment.py
Note: The URI to a remote database server could be specified by specifying the environment variable GEM5ART_DB.
For example, if the mongo database server is running at localhost123, the command to run the launch script would be,
GEM5ART_DB="mongodb://localhost123" python3 launch_spec2017_experiment.py
Appendix I. Working Status
Not all benchmarks are compiled in the above set up as of March 2020. The working status of SPEC 2017 workloads is available here: https://www.gem5.org/documentation/benchmark_status/gem5-20#spec-2017-tests.
Appendix II. Disk Image Generation Scripts
disk-image/spec-2017/install-spec2017.sh: a Bash script that will be executed on the guest machine after Ubuntu Server is installed in the disk image; this script installs depedencies to compile and run SPEC workloads, mounts the SPEC ISO and installs the benchmark suite on the disk image, and creates a SPEC configuration from gcc42 template.
disk-image/spec-2017/post-installation.sh: a script that will be executed on the guest machine; this script copies the serial-getty@.service file to the systemd folder, copies m5 binary to /sbin, and appends the content of runscript.sh to the disk image’s .bashrc file, which will be executed after the booting process is done.
disk-image/spec-2017/runscript.sh: a script that will be copied to .bashrc on the disk image so that the commands in this script will be run immediately after the booting process.
disk-image/spec-2017/spec-2017.json: contains a configuration telling Packer how the disk image should be built.