
last edited: 2026-07-10 00:03:14 +0000
Creating a simple configuration script
This chapter of the tutorial will walk you through how to set up a
simple simulation script for gem5 and to run gem5 for the first time.
It’s assumed that you’ve completed the first chapter of the tutorial and
have successfully built gem5 with an executable build/ALL/gem5.opt.
Our configuration script is going to model a very simple system. We’ll have just one simple CPU core. This CPU core will be connected to a system-wide memory bus. And we’ll have a single DDR3 memory channel, also connected to the memory bus.
gem5 configuration scripts
The gem5 binary takes, as a parameter, a Python script which sets up and executes the simulation. In this script, you create a system to simulate, create all of the components of the system, and specify all of the parameters for the system components. Then, from the script, you can begin the simulation.
There are a number of example configuration scripts that ship with gem5
in configs/examples.
The scripts most relevant to a beginner to gem5 are located in configs/examples/gem5-library.
These are scripts that are intended to be used with the gem5 standard library,
which provides components that can be connected together to form a complete system.
An aside on SimObjects
gem5’s modular design is built around the SimObject type. Most of the components in the simulated system are SimObjects: CPUs, caches, memory controllers, buses, etc. gem5 exports all of these objects from their
C++implementation to python. Thus, from the python configuration script you can create any SimObject, set its parameters, and specify the interactions between SimObjects.See SimObject details for more information.
Setting up a configuration script for gem5 v24.1
Notice: The content of this section is taken from part 1, section 2 of the 2024 gem5 bootcamp. The slides for the bootcamp can be found here
Let’s start by creating a new config file and opening it:
mkdir configs/tutorial/part1/
touch configs/tutorial/part1/simple.py
This is just a normal python file that will be executed by the embedded python in the gem5 executable. Therefore, you can use any features and libraries available in python.
To set up a basic configuration script, we can start by adding our imports:
from gem5.prebuilt.demo.x86_demo_board import X86DemoBoard
from gem5.resources.resource import obtain_resource
from gem5.simulate.simulator import Simulator
Next, add a board to your script:
board = X86DemoBoard()
The X86DemoBoard is a prebuilt board that doesn’t require further configuration and can be used as a complete system as-is. It is not recommended for use in research, however.
The source can be found in the gem5 repository at src/python/gem5/prebuilt/demo/x86_demo_board.py
It has the following properties:
- 3GiB DualChannelDDR4_2400 memory
- A 2 core processor using gem5’s
TIMINGmodel - A private L1, shared L2 cache hierarchy with 64 KiB data and instruction caches and a 8MiB L2 cache.
As of gem5 v24.1, the X86DemoBoard can support both SE (system emulation) and FS (full system) simulations.
Next, let’s set a workload to run on the board:
board.set_workload(
    obtain_resource("x86-ubuntu-24.04-boot-no-systemd")
)
The function obtain_resource downloads workloads and resources.
For the x86-ubuntu-24.04-boot-no-systemd, it downloads a disk image and kernel, and sets default parameters.
The workload boots Ubuntu without systemd. There are three exit events in the workload, and the simulation can exit or perform other operations at each exit event. To change the behavior at an exit event, we will need to set up an exit event handler.
However, we will only run the simulation for 20 billion ticks, or 20 ms, in this example:
sim = Simulator(board)
sim.run(20_000_000_000) # 20 billion ticks or 20 ms
To run the simulation after setting up the configuration script, use the following command:
./build/ALL/gem5.opt configs/tutorial/part1/simple.py
If you are using a pre-built gem5 binary, use the following command:
gem5 configs/tutorial/part1/simple.py
The output should look something like this:
gem5 Simulator System.  https://www.gem5.org
gem5 is copyrighted software; use the --copyright option for details.

gem5 version 24.1.0.0
gem5 compiled Dec 13 2024 14:59:49
gem5 started Dec 16 2024 13:07:46
gem5 executing on amarillo, pid 543078
command line: ./build/ALL/gem5.opt gem5-dev/testing-website-tutorial/tutorial/part1/simple.py

warn: The X86DemoBoard is solely for demonstration purposes. This board is not known to be be representative of any real-world system. Use with caution.
info: Using default config
warn: Max ticks has already been set prior to setting it through the run call. In these cases the max ticks set through the `run` function is used
Global frequency set at 1000000000000 ticks per second
warn: board.workload.acpi_description_table_pointer.rsdt adopting orphan SimObject param 'entries'
src/mem/dram_interface.cc:690: warn: DRAM device capacity (16384 Mbytes) does not match the address range assigned (2048 Mbytes)
src/mem/dram_interface.cc:690: warn: DRAM device capacity (16384 Mbytes) does not match the address range assigned (2048 Mbytes)
src/sim/kernel_workload.cc:46: info: kernel located at: /home/bees/.cache/gem5/x86-linux-kernel-5.4.0-105-generic
      0: board.pc.south_bridge.cmos.rtc: Real-time clock set to Sun Jan  1 00:00:00 2012
board.pc.com_1.device: Listening for connections on port 3467
src/base/statistics.hh:279: warn: One of the stats is a legacy stat. Legacy stat is a stat that does not belong to any statistics::Group. Legacy stat is deprecated.
src/dev/intel_8254_timer.cc:128: warn: Reading current count from inactive timer.
board.remote_gdb: Listening for connections on port 7003
src/sim/simulate.cc:199: info: Entering event queue @ 0.  Starting simulation...
build/ALL/arch/x86/generated/exec-ns.cc.inc:27: warn: instruction 'fninit' unimplemented
Setting up a configuration script for gem5 v21.0
Creating a config file
Let’s start by creating a new config file and opening it:
mkdir configs/tutorial/part1/
touch configs/tutorial/part1/simple.py
This is just a normal python file that will be executed by the embedded python in the gem5 executable. Therefore, you can use any features and libraries available in python.
Next, we’ll create the first SimObject: the system that we are going to
simulate. The System object will be the parent of all the other
objects in our simulated system. The System object contains a lot of
functional (not timing-level) information, like the physical memory
ranges, the root clock domain, the root voltage domain, the kernel (in
full-system simulation), etc. To create the system SimObject, we simply
instantiate it like a normal python class:
system = System()
Now that we have a reference to the system we are going to simulate, let’s set the clock on the system. We first have to create a clock domain. Then we can set the clock frequency on that domain. Setting parameters on a SimObject is exactly the same as setting members of an object in python, so we can simply set the clock to 1 GHz, for instance. Finally, we have to specify a voltage domain for this clock domain. Since we don’t care about system power right now, we’ll just use the default options for the voltage domain.
system.clk_domain = SrcClockDomain()
system.clk_domain.clock = '1GHz'
system.clk_domain.voltage_domain = VoltageDomain()
Once we have a system, let’s set up how the memory will be simulated. We
are going to use timing mode for the memory simulation. You will
almost always use timing mode for the memory simulation, except in
special cases like fast-forwarding and restoring from a checkpoint. We
will also set up a single memory range of size 512 MB, a very small
system. Note that in the python configuration scripts, whenever a size
is required you can specify that size in common vernacular and units
like '512MB'. Similarly, with time you can use time units (e.g.,
'5ns'). These will automatically be converted to a common
representation, respectively.
system.mem_mode = 'timing'
system.mem_ranges = [AddrRange('512MB')]
Now, we can create a CPU. We’ll start with the most simple timing-based CPU in gem5 for the X86 ISA, X86TimingSimpleCPU. This CPU model executes each instruction in a single clock cycle to execute, except memory requests, which flow through the memory system. To create the CPU you can simply just instantiate the object:
system.cpu = X86TimingSimpleCPU()
If we wanted to use the RISCV ISA we could use RiscvTimingSimpleCPU or if
we wanted to use the ARM ISA we could use ArmTimingSimpleCPU. However, we
will continue to use the X86 ISA for this exercise.
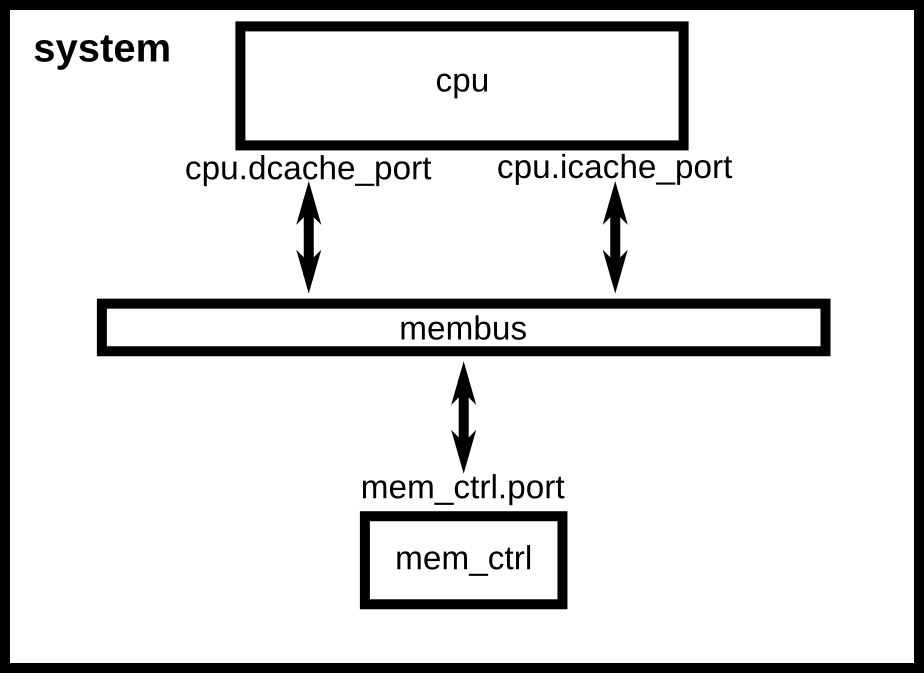
Next, we’re going to create the system-wide memory bus:
system.membus = SystemXBar()
Now that we have a memory bus, let’s connect the cache ports on the CPU to it. In this case, since the system we want to simulate doesn’t have any caches, we will connect the I-cache and D-cache ports directly to the membus. In this example system, we have no caches.
system.cpu.icache_port = system.membus.cpu_side_ports
system.cpu.dcache_port = system.membus.cpu_side_ports
An aside on gem5 ports
To connect memory system components together, gem5 uses a port abstraction. Each memory object can have two kinds of ports, request ports and response ports. Requests are sent from a request port to a response port, and responses are sent from a response port to a request port. When connecting ports, you must connect a request port to a response port.
Connecting ports together is easy to do from the python configuration files. You can simply set the request port
=to the response port and they will be connected. For instance:system.cpu.icache_port = system.l1_cache.cpu_sideIn this example, the cpu’s
icache_portis a request port, and the cache’scpu_sideis a response port. The request port and the response port can be on either side of the=and the same connection will be made. After making the connection, the requestor can send requests to the responder. There is a lot of magic going on behind the scenes to set up the connection, the details of which are unimportant to most users.Another notable kind of magic of the
=of two ports in a gem5 Python configuration is that, it is allowed to have one port on one side, and an array of ports on the other side. For example:system.cpu.icache_port = system.membus.cpu_side_portsIn this example, the cpu’s
icache_portis a request port, and the membus’scpu_side_portsis an array of response ports. In this case, a new response port is spawned on thecpu_side_ports, and this newly created port will be connected to the request port.We will discuss ports and MemObject in more detail in the MemObject chapter.
Next, we need to connect up a few other ports to make sure that our system will function correctly. We need to create an I/O controller on the CPU and connect it to the memory bus. Also, we need to connect a special port in the system up to the membus. This port is a functional-only port to allow the system to read and write memory.
Connecting the PIO and interrupt ports to the memory bus is an x86-specific requirement. Other ISAs (e.g., ARM) do not require these 3 extra lines.
system.cpu.createInterruptController()
system.cpu.interrupts[0].pio = system.membus.mem_side_ports
system.cpu.interrupts[0].int_requestor = system.membus.cpu_side_ports
system.cpu.interrupts[0].int_responder = system.membus.mem_side_ports

system.system_port = system.membus.cpu_side_ports
Next, we need to create a memory controller and connect it to the membus. For this system, we’ll use a simple DDR3 controller and it will be responsible for the entire memory range of our system.
system.mem_ctrl = MemCtrl()
system.mem_ctrl.dram = DDR3_1600_8x8()
system.mem_ctrl.dram.range = system.mem_ranges[0]
system.mem_ctrl.port = system.membus.mem_side_ports
After those final connections, we’ve finished instantiating our simulated system! Our system should look like the figure below.
Next, we need to set up the process we want the CPU to execute. Since we are executing in syscall emulation mode (SE mode), we will just point the CPU at the compiled executable. We’ll execute a simple “Hello world” program. There’s already one that is compiled that ships with gem5, so we’ll use that. You can specify any application built for x86 and that’s been statically compiled.
Full system vs syscall emulation
gem5 can run in two different modes called “syscall emulation” and “full system” or SE and FS modes. In full system mode (covered later full-system-part), gem5 emulates the entire hardware system and runs an unmodified kernel. Full system mode is similar to running a virtual machine.
Syscall emulation mode, on the other hand, does not emulate all of the devices in a system and focuses on simulating the CPU and memory system. Syscall emulation is much easier to configure since you are not required to instantiate all of the hardware devices required in a real system. However, syscall emulation only emulates Linux system calls, and thus only models user-mode code.
If you do not need to model the operating system for your research questions, and you want extra performance, you should use SE mode. However, if you need high fidelity modeling of the system, or OS interaction like page table walks are important, then you should use FS mode.
First, we have to create the process (another SimObject). Then we set the processes command to the command we want to run. This is a list similar to argv, with the executable in the first position and the arguments to the executable in the rest of the list. Then we set the CPU to use the process as it’s workload, and finally create the functional execution contexts in the CPU.
binary = 'tests/test-progs/hello/bin/x86/linux/hello'

# for gem5 V21 and beyond
system.workload = SEWorkload.init_compatible(binary)

process = Process()
process.cmd = [binary]
system.cpu.workload = process
system.cpu.createThreads()
The final thing we need to do is instantiate the system and begin
execution. First, we create the Root object. Then we instantiate the
simulation. The instantiation process goes through all of the SimObjects
we’ve created in python and creates the C++ equivalents.
As a note, you don’t have to instantiate the python class then specify
the parameters explicitly as member variables. You can also pass the
parameters as named arguments, like the Root object below.
root = Root(full_system = False, system = system)
m5.instantiate()
Finally, we can kick off the actual simulation! As a side now, gem5 is
now using Python 3-style print functions, so print is no longer a
statement and must be called as a function.
print("Beginning simulation!")
exit_event = m5.simulate()
And once simulation finishes, we can inspect the state of the system.
print('Exiting @ tick {} because {}'
      .format(m5.curTick(), exit_event.getCause()))
Running gem5
Now that we’ve created a simple simulation script (the full version of which can be found in the gem5 code base at configs/learning_gem5/part1/simple.py ) we’re ready to run gem5. gem5 can take many parameters, but requires just one positional argument, the simulation script. So, we can simply run gem5 from the root gem5 directory as:
build/ALL/gem5.opt configs/tutorial/part1/simple.py
The output should be:
gem5 Simulator System.  http://gem5.org
gem5 is copyrighted software; use the --copyright option for details.

gem5 version 21.0.0.0
gem5 compiled May 17 2021 18:05:59
gem5 started May 17 2021 22:05:20
gem5 executing on amarillo, pid 75197
command line: build/X86/gem5.opt configs/tutorial/part1/simple.py

Global frequency set at 1000000000000 ticks per second
warn: No dot file generated. Please install pydot to generate the dot file and pdf.
warn: DRAM device capacity (8192 Mbytes) does not match the address range assigned (512 Mbytes)
0: system.remote_gdb: listening for remote gdb on port 7005
Beginning simulation!
info: Entering event queue @ 0.  Starting simulation...
Hello world!
Exiting @ tick 490394000 because exiting with last active thread context
Parameters in the configuration file can be changed and the results should be different. For instance, if you double the system clock, the simulation should finish faster. Or, if you change the DDR controller to DDR4, the performance should be better.
Additionally, you can change the CPU model to X86MinorCPU to model an
in-order CPU, or X86O3CPU to model an out-of-order CPU. However,
note that X86O3CPU currently does not work with simple.py, because
X86O3CPU requires a system with separate instruction and data caches
(X86O3CPU does work with the configuration in the next section).
All gem5 BaseCPU’s take the naming format {ISA}{Type}CPU. Ergo, if we wanted
a RISCV Minor CPU we’d use RiscvMinorCPU.
The Valid ISAs are:
- Riscv
- Arm
- X86
- Sparc
- Power
- Mips
The CPU types are:
- AtomicSimpleCPU
- O3CPU
- TimingSimpleCPu
- KvmCPU
- MinorCPU
Next, we will add caches to our configuration file to model a more complex system.