
last edited: 2026-07-10 00:03:14 +0000
More complex config for gem5 v24.1
Notice: The material in the following section is taken from section 2, part 1 of the 2024 gem5 bootcamp. The link to the slides is here
In the previous section, we learned the basics of setting up a Python configuration script for use with gem5. The previous section’s config script uses the X86DemoBoard, which is pre-configured with caches, memory, etc. In this section, we will learn how to use other components in the gem5 standard library to set up a simulation.
What is the gem5 standard library?
The gem5 standard library provides a set of predefined components that can be used to define a system in a configuration script. Without the standard library, you would have to define every part of your simulation, potentially resulting in scripts with hundreds of lines of code even for the most basic of simulations.
Main Idea
Due to its modular, object-oriented design, gem5 can be thought of as a set of components that can be plugged together to form a simulation. The types of components are boards, processors, memory systems, and cache hierarchies:
- Board: The “backbone” of the system. You plug components into the board. The board also contains the system-level things like devices, workload, etc. It’s the boards job to negotiate the connections between other components.
- Processor: Processors connect to boards and have one or more cores.
- Cache hierarchy: A cache hierarchy is a set of caches that can be connected to a processor and memory system.
- Memory system: A memory system is a set of memory controllers and memory devices that can be connected to the cache hierarchy.
Relationship to gem5 models
The C++ code in gem5 specifies parameterized models (typically referred to “SimObjects” in most gem5 literature). These models are then instantiated in the pre-made Python scripts in the gem5 standard library.
The standard library is a way to wrap these models in a standard API into, what we call, components.
The gem5 models are fine grained concepts, while components are coarser grained and typically contain many models instantiated with sensible parameters. For example, a gem5 model could be a core, and a component could be a processor with multiple cores that also specifies bus connections and sets parameters to sensible vlaues.
If you want to create a new component you are encouraged to extend (i.e., subclass) the components in the standard library or create new components. This allows you to choose the models within the component and the value of their parameters.
Setting up the configuration script
First, let’s make a configuration file:
mkdir configs/tutorial/part1/
touch configs/tutorial/part1/components.py
Let’s add our imports:
from gem5.components.boards.simple_board import SimpleBoard
from gem5.components.processors.simple_processor import SimpleProcessor
from gem5.components.cachehierarchies.ruby.mesi_two_level_cache_hierarchy import (
    MESITwoLevelCacheHierarchy,
)
from gem5.components.memory.single_channel import SingleChannelDDR4_2400
from gem5.components.processors.cpu_types import CPUTypes
from gem5.isas import ISA
from gem5.resources.resource import obtain_resource
from gem5.simulate.simulator import Simulator
Next, let’s add our cache hierarchy:
cache_hierarchy = MESITwoLevelCacheHierarchy(
    l1d_size="16KiB",
    l1d_assoc=8,
    l1i_size="16KiB",
    l1i_assoc=8,
    l2_size="256KiB",
    l2_assoc=16,
    num_l2_banks=1,
)
MESITwoLevelCacheHierarchy is a component that represents a two-level MESI cache hierarchy. This uses the Ruby memory model. See [here]https://bootcamp.gem5.org/#02-Using-gem5/05-cache-hierarchies for more information about caches in gem5.
The component for the cache hierarchy is parameterized with the sizes and associativities of the L1 and L2 caches.
Next, let’s add a memory system:
memory = SingleChannelDDR4_2400()
This component represents a single-channel DDR3 memory system.
There is a size parameter that can be used to specify the size of the memory system of the simulated system. You can reduce the size to save simulation time, or use the default for the memory type (e.g., one channel of DDR3 defaults to 8 GiB). There are also multi channel memories available. You can see these gem5 2024 bootcamp slides for more information.
Next, let’s add a processor:
processor = SimpleProcessor(cpu_type=CPUTypes.TIMING, isa=ISA.ARM, num_cores=1)
The SimpleProcessor is a component that allows you to customize the model for the underlying cores.
The cpu_type parameter specifies the type of CPU model to use.
Next, let’s add a board and plug in components:
board = SimpleBoard(
    clk_freq="3GHz",
    processor=processor,
    memory=memory,
    cache_hierarchy=cache_hierarchy,
)
The SimpleBoard can run any ISA in Syscall Emulation (SE) mode.
It is “Simple” due the relative simplicity of SE mode.
Most boards are tied to a specific ISA and require more complex designs to run Full System (FS) simulation.
You can find the boards in the gem5 standard library at src/python/gem5/components/boards. The demo boards are located in src/python/gem5/prebuilt/demo.
Next, set up the workload:
board.set_workload(obtain_resource("arm-gapbs-bfs-run"))
The obtain_resource function downloads the files needed to run the specified workload. In this case “arm-gapbs-bfs-run” is a BFS workload from the GAP Benchmark Suite. You can see more information about this resources at the gem5 resources website here. In general, you can browse all gem5 resources at the gem5 resources website.
Next, set up the simulation:
simulator = Simulator(board=board)
simulator.run()
You can now run the simulation using
./build/ALL/gem5.opt configs/tutorial/part1/components.py
The output should look something like this:
gem5 Simulator System.  https://www.gem5.org
gem5 is copyrighted software; use the --copyright option for details.

gem5 version 24.1.0.0
gem5 compiled Dec 13 2024 14:59:49
gem5 started Dec 16 2024 16:34:29
gem5 executing on amarillo, pid 575999
command line: ./build/ALL/gem5.opt gem5-dev/testing-website-tutorial/tutorial/part1/components.py

info: Using default config
Global frequency set at 1000000000000 ticks per second
src/base/statistics.hh:279: warn: One of the stats is a legacy stat. Legacy stat is a stat that does not belong to any statistics::Group. Legacy stat is deprecated.
src/base/statistics.hh:279: warn: One of the stats is a legacy stat. Legacy stat is a stat that does not belong to any statistics::Group. Legacy stat is deprecated.
board.remote_gdb: Listening for connections on port 7003
src/sim/simulate.cc:199: info: Entering event queue @ 0.  Starting simulation...
src/mem/ruby/system/Sequencer.cc:704: warn: Replacement policy updates recently became the responsibility of SLICC state machines. Make sure to setMRU() near callbacks in .sm files!
src/sim/syscall_emul.cc:86: warn: ignoring syscall set_robust_list(...)
src/sim/syscall_emul.cc:97: warn: ignoring syscall rseq(...)
      (further warnings will be suppressed)
src/sim/mem_state.cc:448: info: Increasing stack size by one page.
src/sim/syscall_emul.hh:1117: warn: readlink() called on '/proc/self/exe' may yield unexpected results in various settings.
      Returning '/home/bees/.cache/gem5/arm-gapbs-bfs'
src/arch/arm/insts/pseudo.cc:174: warn:         instruction 'bti' unimplemented
src/sim/syscall_emul.cc:86: warn: ignoring syscall mprotect(...)
src/sim/syscall_emul.cc:86: warn: ignoring syscall sched_getaffinity(...)
src/sim/mem_state.cc:448: info: Increasing stack size by one page.
src/sim/mem_state.cc:448: info: Increasing stack size by one page.
Generate Time:       0.00503
Build Time:          0.00201
Graph has 1024 nodes and 10496 undirected edges for degree: 10
Trial Time:          0.00011
Trial Time:          0.00010
Trial Time:          0.00010
Trial Time:          0.00009
Trial Time:          0.00011
Trial Time:          0.00010
Trial Time:          0.00010
Trial Time:          0.00010
Trial Time:          0.00010
Trial Time:          0.00013
Average Time:        0.00010
gem5 stdlib File Structure
The gem5 stdlib is located in src/python/gem5/.
Of interest here are the components and prebuilt folders:
gem5/src/python/gem5/components
----/boards
----/cachehierarchies
----/memory
----/processors

gem5/src/python/gem5/prebuilt
----/demo
----/riscvmatched
The components folder contains components with which you can build systems. The prebuilt folder contains various prebuilt systems, including demo systems for the X86, Arm, and RISC-V isas, and riscvmatched, which is a model of SiFive Unmatched.
gem5/src/python/gem5/components
----/boards
    ----/simple
    ----/arm_board
    ----/riscv_board
    ----/x86_board
----/cachehierarchies
----/memory
----/processors
Boards are what components plug into. The SimpleBoard has SE mode only, the ArmBoard has FS mode only, and X86Board and RiscvBoard have both FS and SE mode.
gem5/src/python/gem5/components —-/boards —-/cachehierarchies —-/chi —-/classic —-/ruby —-/memory —-/processors
Cache hierarchy components have a fixed interface to processors and memory.
- Ruby: detailed cache coherence and interconnect
- CHI: Arm CHI-based protocol implemented in Ruby
- Classic caches: Hierarchy of crossbars with inflexible coherence
As of gem5 v24.1, it is possible to use any Ruby cache coherence protocol with the ALL gem5 build. This is the build included in pre-compiled binaries.
gem5/src/python/gem5/components
----/boards
----/cachehierarchies
----/memory
    ----/single_channel
    ----/multi_channel
    ----/dramsim
    ----/dramsys
    ----/hbm
----/processors
The memory directory contains pre-configured (LP)DDR3/4/5 DIMMs. Single and multi channel memory systems are available.
There is integration with DRAMSim and DRAMSys, which while not needed for accuracy, is useful for comparisons.
The hbm directory is an HBM stack.
gem5/src/python/gem5/components
----/boards
----/cachehierarchies
----/memory
----/processors
    ----/generators
    ----/simple
    ----/switchable
The processors directory mostly contains configurable processors to build off of.
Generators create synthetic traffic, but act like processors. They have linear, random, and more interesting patterns.
Simple processors only have default parameters and one ISA.
Switchable processors allow you to change processor types during simulation.
More on processors
Processors are made up of cores.
Cores have a “BaseCPU” as a member. This is the actual CPU model.
Processor is what interfaces with CacheHierarchy and Board
Processors are organized, structured sets of cores. They define how cores connect with each other and with outside components and the board though standard interface.
gem5 has three (or four or five) different processor models
They are as follows:
CPUTypes.TIMING: A simple in-order CPU model
This is a “single cycle” CPU. Each instruction takes the time to fetch and executes immediately.
Memory operations take the latency of the memory system.
OK for doing memory-centric studies, but not good for most research.
CPUTypes.O3: An out-of-order CPU model
Highly detailed model based on the Alpha 21264.
Has ROB, physical registers, LSQ, etc.
Don’t use SimpleProcessor if you want to configure this.
CPUTypes.MINOR: An in-order core model
A high-performance in-order core model.
Configurable four-stage pipeline
Don’t use SimpleProcessor if you want to configure this.
CPUTypes.ATOMIC: Used in “atomic” mode (more later)
CPUTypes.KVM: This is covered in detail in the 2024 gem5 bootcamp.
FS vs SE mode
SE mode relays application syscalls to the host OS. This means we don’t need to simulate an OS for applications to run.
In addition, we can access host resources such as files of libraries to dynamically link in.
Don’t treat SE mode as “FS but faster”: You must understand what you’re simulating and whether it will impact results. Not all syscalls will ever be implemented: We’d love to have all the syscalls implemented but Linux changes rapidly. We try to cover common use-cases but we can’t cover everything. If a Syscall is missing, you can implement it, ignore it, or use FS mode. Binaries with elevated privileges do not work in SE mode: If you’re running a binary that requires elevated privileges, you’ll need to run it in FS mode.
FS mode does everything SE mode does (and more!) but can take longer to get to the region of interest. You have to wait for the OS to boot each time (unless you accelerate the simulation).
However, as SE mode doesn’t simulate the OS, you risk missing important events triggered via syscalls, I/O, or the operating system, which may mean your simulated system doesn’t properly reflect the real system.
Think through what SE mode is doing and if it’s right for your use-case. If in doubt, use FS mode. It’s (generally) not worth the risk using SE mode if you’re not sure.
Full Boot Example
For an example of a configuration file that runs the entire boot of Ubuntu 24.04 on an X86 system, see the gem5 stdlib documentation. Of note is that we need to define an exit event handler in order to get through the entire boot:
def exit_event_handler():
    print("First exit: kernel booted")
    yield False  # gem5 is now executing systemd startup
    print("Second exit: Started `after_boot.sh` script")
    # The after_boot.sh script is executed after the kernel and systemd have
    # booted.
    # Here we switch the CPU type to Timing.
    print("Switching to Timing CPU")
    processor.switch()
    yield False  # gem5 is now executing the `after_boot.sh` script
    print("Third exit: Finished `after_boot.sh` script")
    # The after_boot.sh script will run a script if it is passed via
    # m5 readfile. This is the last exit event before the simulation exits.
    yield True

simulator = Simulator(
    board=board,
    on_exit_event={
        ExitEvent.EXIT: exit_event_handler(),
    },
)
At the first exit event, the generator yields False to continue the simulation. At the second exit event, the generator switches the CPUs, then yields False again. At the third exit event, it yields True to end the simulation.
There are various types of exit events. The Simulator has default behavior for these events, but they can be overridden.
ExitEvent.EXIT
ExitEvent.CHECKPOINT
ExitEvent.FAIL
ExitEvent.SWITCHCPU
ExitEvent.WORKBEGIN
ExitEvent.WORKEND
ExitEvent.USER_INTERRUPT
ExitEvent.MAX_TICK
Key idea: The Simulator object controls simulation
To place our idea of gem5:
models (or SimObjects) are the fine-grained objects that are connected together in Python scripts to form a simulation. components are the coarse-grained objects that are connected defined as a set of configured models in Python scripts to form and delivered as part of the Standard Library The standard library allows users to specify a board and specify the properties of the board by specify the components that are connected to it. The Simulator takes a board and launches the simulation and gives an API which allows for control of the simulation: specifying the simulation stopping and restarting condition, replacing components “on the fly”, defining when the simulation should stop and start, etc. See src/python/gem5/simulate/simulator.py for the Simulator source.
Simulator parameters are as follows:
board: The Board to simulate (required) full_system: Whether to simulate a full system (default: False, can be inferred from the board, not needed specified in most cases) on_exit_event: A complex data structure that allows you to control the simulation. The simulator exits for many reasons, this allows you to customize what happens. We just saw an example. checkpoint_path: If we’re restoring from a checkpoint, this is the path to the checkpoint. More on checkpoints later. id: An optional name for this simulation. Used in multisim. More on this in the future.
Some useful functions are below:
run(): Run the simulation get/set_max_ticks(max_tick): Set the absolute tick to stop simulation. Generates a MAX_TICK exit event that can be handled. schedule_max_insts(inst_number): Set the number of instructions to run before stopping. Generates a MAX_INSTS exit event that can be handled. Note that if running multiple cores, this happens if any core reaches this number of instructions. get_stats(): Get the statistics from the simulation. Returns a dictionary of statistics.
See src/python/gem5/simulate/simulator.py for more details.
Creating new standard library components
The gem5 standard library is designed around extension and encapsulation, not parametarization. If you want to create a component with different parameters, extend using object-oriented semantics.
We will now create a new component. We will specialize/extend the “BaseCPUProcessor” to create an ARM processor with a singular out-of-order core.
First, let’s add our imports:
from gem5.components.boards.simple_board import SimpleBoard
from gem5.components.cachehierarchies.ruby.mesi_two_level_cache_hierarchy import (
    MESITwoLevelCacheHierarchy,
)
from gem5.components.memory.single_channel import SingleChannelDDR4_2400
from gem5.resources.resource import obtain_resource
from gem5.simulate.simulator import Simulator
from gem5.isas import ISA

from gem5.components.processors.base_cpu_core import BaseCPUCore
from gem5.components.processors.base_cpu_processor import BaseCPUProcessor

from m5.objects import ArmO3CPU
from m5.objects import TournamentBP
Next, let’s make a new subclass to specialize the core’s parameters:
class MyOutOfOrderCore(BaseCPUCore):
    def __init__(self, width, rob_size, num_int_regs, num_fp_regs):
        super().__init__(ArmO3CPU(), ISA.ARM)
        self.core.fetchWidth = width
        self.core.decodeWidth = width
        self.core.renameWidth = width
        self.core.issueWidth = width
        self.core.wbWidth = width
        self.core.commitWidth = width

        self.core.numROBEntries = rob_size

        self.core.numPhysIntRegs = num_int_regs
        self.core.numPhysFloatRegs = num_fp_regs

        self.core.branchPred = TournamentBP()

        self.core.LQEntries = 128
        self.core.SQEntries = 128
Next, let’s make a processor using this core. The BaseCPUProcessor assumes a list of cores that are BaseCPUCores. We’ll just make one core and pass the parameters to it:
class MyOutOfOrderProcessor(BaseCPUProcessor):
    def __init__(self, width, rob_size, num_int_regs, num_fp_regs):
        cores = [MyOutOfOrderCore(width, rob_size, num_int_regs, num_fp_regs)]
        super().__init__(cores)
Next, let’s use these components to set up a processor for the simulation:
my_ooo_processor = MyOutOfOrderProcessor(
    width=8, rob_size=192, num_int_regs=256, num_fp_regs=256
)
Finally, let’s set up the rest of the simulation:
main_memory = SingleChannelDDR4_2400(size="2GB")

cache_hierarchy = MESITwoLevelCacheHierarchy(
    l1d_size="16kB",
    l1d_assoc=8,
    l1i_size="16kB",
    l1i_assoc=8,
    l2_size="256kB",
    l2_assoc=16,
    num_l2_banks=1,
)
board = SimpleBoard(
    processor=my_ooo_processor,
    memory=main_memory,
    cache_hierarchy=cache_hierarchy,
    clk_freq="3GHz",
)

board.set_workload(obtain_resource("arm-gapbs-bfs-run"))

simulator = Simulator(board)
simulator.run()
You can now run this simulation with the following command, assuming that your configuration script is named config.py:
./build/ALL/gem5.opt config.py
If you have a pre-built binary, you can simply use the following command:
gem5 config.py
gem5 v21.0: Adding cache to the configuration script
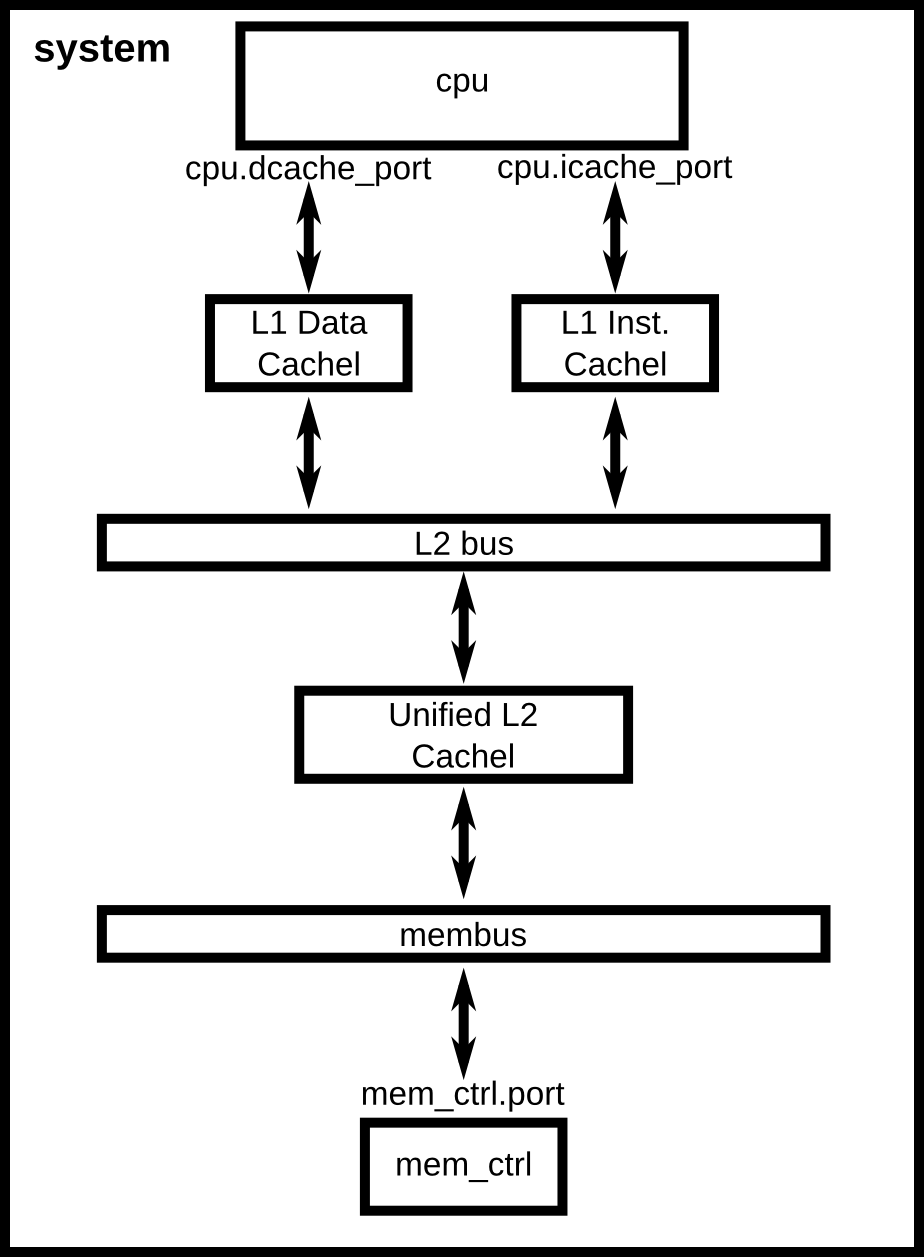
Using the previous configuration script as a starting point, this chapter will walk through a more complex configuration. We will add a cache hierarchy to the system as shown in the figure below. Additionally, this chapter will cover understanding the gem5 statistics output and adding command line parameters to your scripts.
Creating cache objects
We are going to use the classic caches, instead of ruby-intro-chapter, since we are modeling a single CPU system and we don’t care about modeling cache coherence. We will extend the Cache SimObject and configure it for our system. First, we must understand the parameters that are used to configure Cache objects.
Classic caches and Ruby
gem5 currently has two completely distinct subsystems to model the on-chip caches in a system, the “Classic caches” and “Ruby”. The historical reason for this is that gem5 is a combination of m5 from Michigan and GEMS from Wisconsin. GEMS used Ruby as its cache model, whereas the classic caches came from the m5 codebase (hence “classic”). The difference between these two models is that Ruby is designed to model cache coherence in detail. Part of Ruby is SLICC, a language for defining cache coherence protocols. On the other hand, the classic caches implement a simplified and inflexible MOESI coherence protocol.
To choose which model to use, you should ask yourself what you are trying to model. If you are modeling changes to the cache coherence protocol or the coherence protocol could have a first-order impact on your results, use Ruby. Otherwise, if the coherence protocol isn’t important to you, use the classic caches.
A long-term goal of gem5 is to unify these two cache models into a single holistic model.
Cache
The Cache SimObject declaration can be found in src/mem/cache/Cache.py.
This Python file defines the parameters which you can set of the
SimObject. Under the hood, when the SimObject is instantiated these
parameters are passed to the C++ implementation of the object. The
Cache SimObject inherits from the BaseCache object shown below.
Within the BaseCache class, there are a number of parameters. For
instance, assoc is an integer parameter. Some parameters, like
write_buffers have a default value, 8 in this case. The default
parameter is the first argument to Param.*, unless the first argument
is a string. The string argument of each of the parameters is a
description of what the parameter is (e.g.,
tag_latency = Param.Cycles("Tag lookup latency") means that the
tag_latency controls “The hit latency for this cache”).
Many of these parameters do not have defaults, so we are required to set
these parameters before calling m5.instantiate().
Now, to create caches with specific parameters, we are first going to
create a new file, caches.py, in the same directory as simple.py,
configs/tutorial/part1. The first step is to import the SimObject(s)
we are going to extend in this file.
from m5.objects import Cache
Next, we can treat the BaseCache object just like any other Python class and extend it. We can name the new cache anything we want. Let’s start by making an L1 cache.
class L1Cache(Cache):
    assoc = 2
    tag_latency = 2
    data_latency = 2
    response_latency = 2
    mshrs = 4
    tgts_per_mshr = 20
Here, we are setting some of the parameters of the BaseCache that do not have default values. To see all of the possible configuration options, and to find which are required and which are optional, you have to look at the source code of the SimObject. In this case, we are using BaseCache.
We have extended BaseCache and set most of the parameters that do not
have default values in the BaseCache SimObject. Next, let’s two more
sub-classes of L1Cache, an L1DCache and L1ICache
class L1ICache(L1Cache):
    size = '16kB'

class L1DCache(L1Cache):
    size = '64kB'
Let’s also create an L2 cache with some reasonable parameters.
class L2Cache(Cache):
    size = '256kB'
    assoc = 8
    tag_latency = 20
    data_latency = 20
    response_latency = 20
    mshrs = 20
    tgts_per_mshr = 12
Now that we have specified all of the necessary parameters required for
BaseCache, all we have to do is instantiate our sub-classes and
connect the caches to the interconnect. However, connecting lots of
objects up to complex interconnects can make configuration files quickly
grow and become unreadable. Therefore, let’s first add some helper
functions to our sub-classes of Cache. Remember, these are just Python
classes, so we can do anything with them that you can do with a Python
class.
To the L1 cache let’s add two functions, connectCPU to connect a CPU
to the cache and connectBus to connect the cache to a bus. We need to
add the following code to the L1Cache class.
def connectCPU(self, cpu):
    # need to define this in a base class!
    raise NotImplementedError

def connectBus(self, bus):
    self.mem_side = bus.cpu_side_ports
Next, we have to define a separate connectCPU function for the
instruction and data caches, since the I-cache and D-cache ports have a
different names. Our L1ICache and L1DCache classes now become:
class L1ICache(L1Cache):
    size = '16kB'

    def connectCPU(self, cpu):
        self.cpu_side = cpu.icache_port

class L1DCache(L1Cache):
    size = '64kB'

    def connectCPU(self, cpu):
        self.cpu_side = cpu.dcache_port
Finally, let’s add functions to the L2Cache to connect to the
memory-side and CPU-side bus, respectively.
def connectCPUSideBus(self, bus):
    self.cpu_side = bus.mem_side_ports

def connectMemSideBus(self, bus):
    self.mem_side = bus.cpu_side_ports
The full file can be found in the gem5 source at
configs/learning_gem5/part1/caches.py.
Adding caches to the simple config file
Now, let’s add the caches we just created to the configuration script we created in the last chapter.
First, let’s copy the script to a new name.
cp ./configs/tutorial/part1/simple.py ./configs/tutorial/part1/two_level.py
First, we need to import the names from the caches.py file into the
namespace. We can add the following to the top of the file (after the
m5.objects import), as you would with any Python source.
from caches import *
Now, after creating the CPU, let’s create the L1 caches:
system.cpu.icache = L1ICache()
system.cpu.dcache = L1DCache()
And connect the caches to the CPU ports with the helper function we created.
system.cpu.icache.connectCPU(system.cpu)
system.cpu.dcache.connectCPU(system.cpu)
You need to remove the following two lines which connected the cache ports directly to the memory bus.
system.cpu.icache_port = system.membus.cpu_side_ports
system.cpu.dcache_port = system.membus.cpu_side_ports
We can’t directly connect the L1 caches to the L2 cache since the L2 cache only expects a single port to connect to it. Therefore, we need to create an L2 bus to connect our L1 caches to the L2 cache. The, we can use our helper function to connect the L1 caches to the L2 bus.
system.l2bus = L2XBar()

system.cpu.icache.connectBus(system.l2bus)
system.cpu.dcache.connectBus(system.l2bus)
Next, we can create our L2 cache and connect it to the L2 bus and the memory bus.
system.l2cache = L2Cache()
system.l2cache.connectCPUSideBus(system.l2bus)
system.membus = SystemXBar()
system.l2cache.connectMemSideBus(system.membus)
Note that system.membus = SystemXBar() has been defined before
system.l2cache.connectMemSideBus so we can pass it to
system.l2cache.connectMemSideBus. Everything else in the file
stays the same! Now we have a complete configuration with a
two-level cache hierarchy. If you run the current file, hello
should now finish in 57467000 ticks. The full script can
be found in the gem5 source at
configs/learning_gem5/part1/two_level.py.
Adding parameters to your script
When performing experiments with gem5, you don’t want to edit your configuration script every time you want to test the system with different parameters. To get around this, you can add command-line parameters to your gem5 configuration script. Again, because the configuration script is just Python, you can use the Python libraries that support argument parsing. Although pyoptparse is officially deprecated, many of the configuration scripts that ship with gem5 use it instead of pyargparse since gem5’s minimum Python version used to be 2.5. The minimum Python version is now 3.6, so Python’s argparse is a better option when writing new scripts that don’t need to interact with the current gem5 scripts. To get started using :pyoptparse, you can consult the online Python documentation.
To add options to our two-level cache configuration, after importing our caches, let’s add some options.
import argparse

parser = argparse.ArgumentParser(description='A simple system with 2-level cache.')
parser.add_argument("binary", default="", nargs="?", type=str,
                    help="Path to the binary to execute.")
parser.add_argument("--l1i_size",
                    help=f"L1 instruction cache size. Default: 16kB.")
parser.add_argument("--l1d_size",
                    help="L1 data cache size. Default: Default: 64kB.")
parser.add_argument("--l2_size",
                    help="L2 cache size. Default: 256kB.")

options = parser.parse_args()
Note that if you wanted to pass the binary file’s path the way shown above
and use it through options, you should specify it as options.binary.
For example:
system.workload = SEWorkload.init_compatible(options.binary)
Now, you can run
build/ALL/gem5.opt configs/tutorial/part1/two_level.py --help which
will display the options you just added.
Next, we need to pass these options onto the caches that we create in the configuration script. To do this, we’ll simply change two_level_opts.py to pass the options into the caches as a parameter to their constructor and add an appropriate constructor, next.
system.cpu.icache = L1ICache(options)
system.cpu.dcache = L1DCache(options)
...
system.l2cache = L2Cache(options)
In caches.py, we need to add constructors (__init__ functions in
Python) to each of our classes. Starting with our base L1 cache, we’ll
just add an empty constructor since we don’t have any parameters which
apply to the base L1 cache. However, we can’t forget to call the super
class’s constructor in this case. If the call to the super class
constructor is skipped, gem5’s SimObject attribute finding function will
fail and the result will be
“RuntimeError: maximum recursion depth exceeded” when you try to
instantiate the cache object. So, in L1Cache we need to add the
following after the static class members.
def __init__(self, options=None):
    super(L1Cache, self).__init__()
    pass
Next, in the L1ICache, we need to use the option that we created
(l1i_size) to set the size. In the following code, there is guards for
if options is not passed to the L1ICache constructor and if no
option was specified on the command line. In these cases, we’ll just use
the default we’ve already specified for the size.
def __init__(self, options=None):
    super(L1ICache, self).__init__(options)
    if not options or not options.l1i_size:
        return
    self.size = options.l1i_size
We can use the same code for the L1DCache:
def __init__(self, options=None):
    super(L1DCache, self).__init__(options)
    if not options or not options.l1d_size:
        return
    self.size = options.l1d_size
And the unified L2Cache:
def __init__(self, options=None):
    super(L2Cache, self).__init__()
    if not options or not options.l2_size:
        return
    self.size = options.l2_size
With these changes, you can now pass the cache sizes into your script from the command line like below.
build/ALL/gem5.opt configs/tutorial/part1/two_level.py --l2_size='1MB' --l1d_size='128kB'
gem5 Simulator System.  http://gem5.org
gem5 is copyrighted software; use the --copyright option for details.

gem5 version 21.0.0.0
gem5 compiled May 17 2021 18:05:59
gem5 started May 18 2021 00:00:33
gem5 executing on amarillo, pid 83118
command line: build/X86/gem5.opt configs/tutorial/part1/two_level.py --l2_size=1MB --l1d_size=128kB

Global frequency set at 1000000000000 ticks per second
warn: No dot file generated. Please install pydot to generate the dot file and pdf.
warn: DRAM device capacity (8192 Mbytes) does not match the address range assigned (512 Mbytes)
0: system.remote_gdb: listening for remote gdb on port 7005
Beginning simulation!
info: Entering event queue @ 0.  Starting simulation...
Hello world!
Exiting @ tick 57467000 because exiting with last active thread context
The full scripts can be found in the gem5 source at
configs/learning_gem5/part1/caches.py and
configs/learning_gem5/part1/two_level.py.